Share with Your Network
1. Keyboard Shortcuts
Keyboard shortcuts are available from the home screen. Want to know what they are? Click the Keyboard Shortcuts link in the bottom right sidebar or just
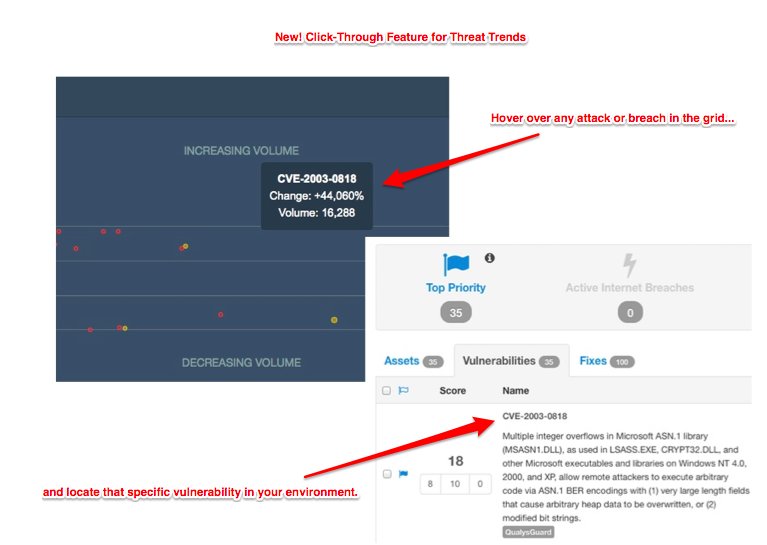
2. Threat Trends Click-Through
Clicking on any of the attack or breach bubbles within the threat trends view will filter your assets by only displaying those that are vulnerable to that attack or exploit. Didn’t know threat trends existed? Go to the dashboard and open the threat trends “drawer” by clicking on it in the bottom of your screen.
3. Threat Trends History
Speaking of threat trends and keyboard shortcuts, there’s a hidden shortcut within threat trends. By clicking on the left and right arrows, you can page through threat trends historically one week at a time.
4. Bulk Editing
You can edit multiple assets and vulnerabilities at a time using the bulk editing menu. To edit multiple assets or vulnerabilities at once, just select the ones you want to edit with the checkbox on the left side of the asset and vulnerability table. At the top right of the table you’ll see our bulk editor. For assets, you can set their priority score, add and remove tags, and mark them inactive or active. For vulnerabilities, you can create a Jira ticket (requires a Jira connector) or edit any custom fields. Didn’t know we had custom fields??
5. Custom Fields
In addition to tagging assets you can create custom fields for vulnerabilities. To define a new custom field, click the gear icon in the upper right and choose custom fields. Click New Custom Field. Complete the form by naming the field, provide an optional description, select the field data type (string, numeric, or date), and if you’d like to filter your vulnerabilities on this field check the faceted search box then save it.
Once you have defined your custom fields you can add them to vulnerabilities either in bulk via the method above or on an individual vulnerability. To define for an individual vulnerability, just click on the vulnerability details arrow from the home screen and then click edit on the right hand side of your screen. Assign your own creative values to your custom hearts content.
6. Heads Up Display (HUD)
Our Heads Up Display is accessible from the home screen by clicking on the bar chart in the upper right corner. Opening up the HUD displays a breakdown of the CVSS metrics and subscores of the vulnerabilities currently under review. You can click on any of the values within the charts to filter your vulnerabilities by those values.
7. Compare Teams/Applications/Networks/BUs via Tagview
You can compare any set of assets side-by-side with meta data using the tag view within the dashboard. Want to compare multiple teams, different applications or maybe even business units against each other? Within the dashboard select the tag view tab and enter the tagged assets you’d like to compare to each other in the tag filter box. For easier comparison, you can select either stacked or grouped charts.
8. RBAC
You can restrict access in RIO using Role Based Access Control (RBAC). First you’ll need to create a role by clicking the gear in the upper right of your screen and selecting user roles. Select New Role and complete the form including naming the role, selecting whether the role will have read only or read+write access and then entering the tag(s) to the assets this role will have access to. Next save the role.
Assign a user to a role from the gear in the upper right select users. You can edit an existing user or create a new user. In the user form select the role from the role drop down and save it. Done.
9. Search by IP Range
If you want to find assets by an IP range, you can use the search box in the home screen. An example of a search query by ip range would be:
ip_address_locator:[10.0.0.0 TO 10.255.255.255]
This will produce a list of assets in your 10-dot network.
If you want to find all of your internal RFC 1918 assets you could perform a search like:
ip_address_locator:[10.0.0.0 TO 10.255.255.255] ip_address_locator:[192.168.0.0 TO 192.168.255.255] ip_address_locator:[172.16.0.0 TO 172.16.255.255]
You can also perform a negative search. For example, you could take the same search above and find any asset that doesn’t have an RFC 1918 internal address by adding a ‘-‘ in front of the key to look like this:
-ip_address_locator:[10.0.0.0 TO 10.255.255.255] -ip_address_locator:[192.168.0.0 TO 192.168.255.255] -ip_address_locator:[172.16.0.0 TO 172.16.255.255]
10. Jira Ticketing
If you use Jira for trouble ticketing or bug tracking, you can send vulnerabilities for remediaiton to Jira directly from Risk I/O. You can send multiple vulnerabilities to a single ticket in Jira using the bulk editor as described above. You can also send an individual vulnerability to Jira by opening up the vulnerabilities details page and clicking the Create Jira Issue button on the right side panel. After you submit the issue, we’ll persist the issue ID, assignee, due dates and it’s status within the vulnerability details in Risk I/O.
11. RESTful API
Did you know we have a robust RESTful API? You can find the full doc here: https://api.risk.io
